
Choosing the wrong neon flex can ruin your project and waste money. Imagine a beautiful sign with dark spots because the light couldn't handle the bend. Understanding the difference is key.
Choose top-bend neon flex1 for straight architectural outlines and gentle curves where the light shines directly out. Use side-bend neon flex2 for intricate signs and shapes, as it bends left and right to form letters and designs easily. They are not interchangeable products.

You now know the basic rule for choosing between top-bend and side-bend neon flex2. But the details are what make a project truly professional and long-lasting. As a manufacturer with 10 production lines, I've seen firsthand how this choice impacts the final result. Let's dive deeper into when and why you'd pick each type, so your next project is a complete success from the start.
When Should You Use Top-Bend Neon Flex for Your Project?
Need a clean, straight line of light for a building facade or under a cabinet? Using the wrong flex can create an ugly, bumpy look instead of a smooth, professional line. Top-bend neon flex is designed specifically for these kinds of straight applications.
Use top-bend neon flex1 for architectural lighting3, cove lighting4, and under-cabinet illumination5. Its up-and-down bending is perfect for following straight building lines or creating large, gentle arcs where the light needs to face directly outwards from the surface.

Let's break down top-bend neon flex1 in more detail. The name says it all. The light shines out from the "top" surface of the strip. More importantly, it only bends in one direction: up and down, along its vertical axis. Think of it like a wave moving across the water. This design feature is intentional and crucial for its best applications.
The Bending Mechanics of Top-Bend Flex
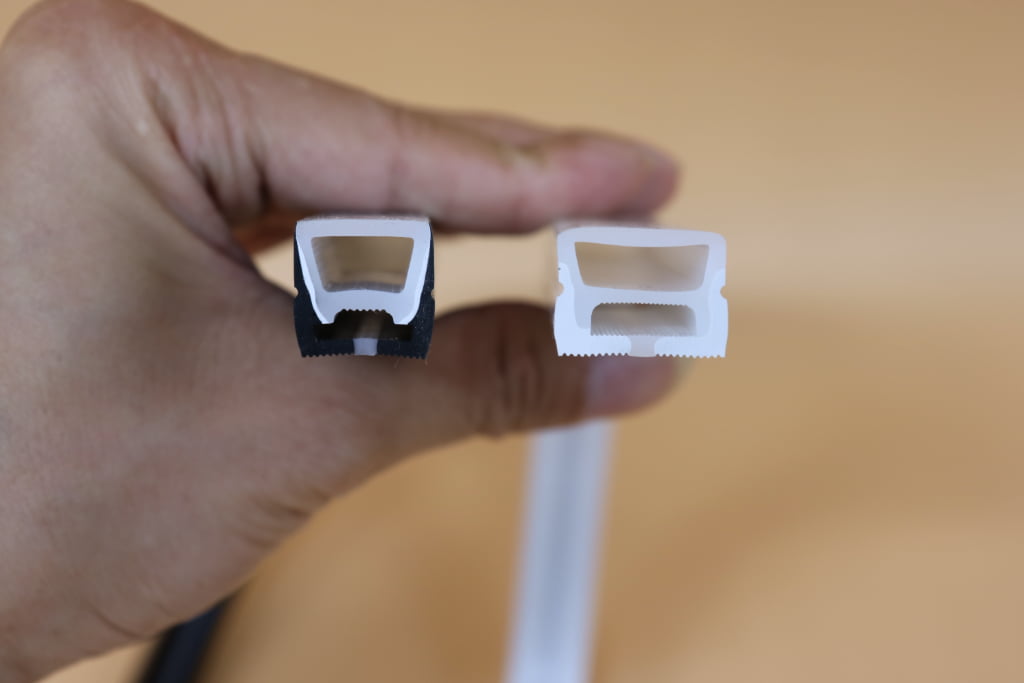
The internal LED circuit board6 is laid flat inside the silicone housing. This allows the strip to curve up or down without putting stress on the electronic components. However, if you try to bend it sideways, you will put immense pressure on the circuit board and solder points. This will almost certainly cause a break, leading to dark spots and product failure. I always tell my clients that you cannot force this product to make a letter 'S' or any sharp, side-to-side turn. It's simply not what it was made for.
Ideal Applications for Top-Bend
This vertical bending makes it the perfect choice for architectural outlining. You can easily follow the straight contours of a roofline, a wall, or a long hallway. It’s also great for creating large, sweeping curves on a building's facade. For interior projects, it provides a perfect linear glow for cove lighting4 or under-cabinet task lighting. The light projects straight out, giving you a clean, dot-free line.
| Feature | Top-Bend Neon Flex |
|---|---|
| Bending Direction | Vertical (Up/Down) |
| Light Direction | Out from the top surface |
| Best Use Cases | Building facades, cove lighting4, straight lines, hotel decor |
| Avoid | Tight curves, letters, complex logos |
Why is Side-Bend Neon Flex the Go-To for Custom Signage?
Are you trying to create a complex logo or a script-style sign with neon? Using a stiff, inflexible light source will make your design look clunky and unprofessional. Side-bend neon flex offers the perfect flexibility to create sharp curves and detailed shapes.
Side-bend neon flex is the best choice for signage, logos, and artistic installations. It bends horizontally (left and right), allowing you to easily form letters, script, and intricate designs. The light emits from the side, which is ideal when mounted flat against a surface.

Side-bend neon flex is the workhorse of the signage industry, and for good reason. Unlike its top-bend counterpart, this product is designed for intricate, two-dimensional work. The light shines out from the "side" of the strip, and its bending axis is horizontal. Imagine a snake slithering on the ground—that's how side-bend flex moves. This flexibility is what allows designers and installers to create amazing things.
How Side-Bend Flex Achieves Complex Shapes
In a side-bend product, the internal LED circuit board6 is placed vertically inside the silicone housing. This construction allows the strip to bend left and right with a very tight radius without damaging the components. The silicone casing is specifically engineered to support this movement.
This is why you can easily lay a piece of side-bend flex on a table and spell out a name or trace a complex logo. You can create sharp corners and smooth curves with ease. I remember a customer who wanted to create a large, cursive logo for their office. We sent them our side-bend flex, and their installers were able to trace the design perfectly on-site. The final result was a seamless, bright sign that looked exactly like their brand.
Key Scenarios for Side-Bend
This product is the only choice for custom neon signs, detailed logos, and any application that requires forming letters or complex shapes. Because the light emits from the side, it's perfect for mounting on a flat backing board. The light shines outward, creating a bright, clear image.
| Feature | Side-Bend Neon Flex |
|---|---|
| Bending Direction | Horizontal (Left/Right) |
| Light Direction | Out from the side edge |
| Best Use Cases | Custom signs, logos, lettering, art installations |
| Avoid | Long, straight architectural lines (can be less rigid than top-bend) |
Can You Mix Top-Bend and Side-Bend in One Project?
Thinking about combining straight lines and sharp curves in one big design? Mixing products without a plan can lead to different light outputs, colors, and a messy final look. You can mix them, but you need to plan carefully to ensure a professional appearance.
Yes, you can mix top-bend and side-bend neon flex2 in a single project, but it requires careful planning. You must ensure both products have matching color temperature7s, brightness, and profiles. This is best for complex designs that combine architectural lines with signage elements.

Combining both types of neon flex can create truly unique and dynamic lighting installations8. For example, a client might want to outline the rectangular shape of their storefront with a straight line of light, and then add their company logo in the middle. This requires both top-bend for the outline and side-bend for the logo. As a manufacturer, we handle these requests often, but success depends on careful planning.
Ensuring Visual Consistency
The biggest challenge is making sure the light looks the same from both products. You must match the brightness (measured in lumens9) and the color temperature7 (measured in Kelvin). If one is 3000K warm white and the other is 3100K, the difference will be noticeable and look unprofessional. When a client needs both types, I make sure we use LED chips from the same production batch for their entire order. This guarantees a perfect match in color and intensity.
Planning for Connections and Mounting
You also need a plan for the physical transitions. The power connections10 and mounting clips11 are different for each type. The transition point where a top-bend strip meets a side-bend strip must be planned so the wiring can be hidden cleanly. Often, this is done inside a wall or a custom-built sign housing. The mounting also differs; top-bend often sits in a rigid aluminum channel, while side-bend is typically clipped directly onto a surface. My team often helps customers by reviewing their design drawings to map out these connection and mounting points ahead of time.
Conclusion
Choosing correctly is simple. Use top-bend for straight lines and gentle arcs. Use side-bend for signs and shapes. This ensures your project looks professional and lasts long.
---Explore this resource to understand how top-bend neon flex can enhance architectural designs with clean, straight lines. ↩
Learn about side-bend neon flex and its flexibility for creating intricate signage and artistic designs. ↩
Discover expert tips on architectural lighting to elevate your projects and create stunning visual effects. ↩
Find out how cove lighting can transform spaces with ambient illumination and stylish designs. ↩
Get insights on selecting the right under-cabinet lighting to enhance functionality and aesthetics in your kitchen. ↩
Learn about the technology behind LED circuit boards and their role in neon flex lighting. ↩
Understand color temperature and its impact on lighting design to create the desired atmosphere. ↩
Discover innovative lighting installations that can enhance the ambiance and functionality of commercial spaces. ↩
Learn about lumens and how they influence brightness in lighting choices for your projects. ↩
Learn best practices for power connections to ensure safety and reliability in your lighting projects. ↩
Find the best mounting clips for neon flex to ensure secure and professional installations. ↩